Wednesday, June 24, 2015

It's Water-Wise Wednesday with Frannie the Fish! {"Let's Keep It Clean" Program Series - Senior}

 Frannie will tell you all about the Senior level resources and activities for the “Let’s Keep It Clean” patch program this week!


To earn the cool patches shown above, complete two activities from the booklet to earn your Ask Me About Groundwater patch.  Get inspired and do more to earn your Let’s Keep It Clean patch. 

Whether you are a meat-eater, vegetarian, or vegan, water is used to produce your food.  The Senior “Let’s Keep It Clean” booklet explores water’s role in food production.  Girls can investigate how much water is needed to grow crops or raise animals, find out what local water resources are used for agriculture, and learn how pumping groundwater for irrigation affects surface water.  Scouts can also research different types of irrigation.  Irrigation is adding more water to crop to supplement what’s provided by nature.  Once Seniors understand the connection between water and growing our food, they can learn how to protect water.  Girls can investigate local water quality by visiting a local water utility or by checking into a community’s annual water quality report.  Another option is to learn about water conservation programs.


Frannie is going to make her own center pivot!  Center pivots are one type of irrigation system - you may have seen one when you are taking a road trip.  Center pivots have a series of sprinklers or drop hoses along a pipe that is supported by trusses and mounted on a series of towers.  Each tower is on wheels and rotates, or pivots, around a center point, moving in a circle.  Water is pumped through the center tower, also called the pivot point.  Center pivots are generally nine feet tall but can be various heights depending on the crop being grown.


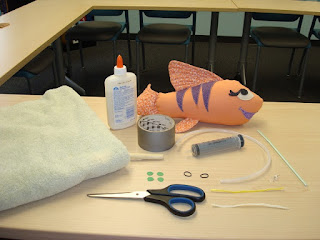
Supplies

  • Bendable drinking straw
  • Two coffee stirring straws (flexible) – in this case Frannie is using twisty ties
  • Four buttons (1/2” to 1” diameter) – Frannie is using circles she cut out of construction paper
  • Two small rubber bands
  • Thumbtack
  • Scissors
  • Quick dry craft clue
  • Modeling clay or plumber’s putty
  • Aquarium airline tubing, 8” length
  • Lure tip, or other needle-less oral syringe (obtain from a medical supply company, veterinarian, or pharmacy)
  • ½ yard of felt, fabric, butcher paper, or craft paper


For More Fun:

  • Yarn, 4 pieces cut to (roughly) 3” long
  • Darning needle

Instructions

Refer to the illustration below for assembly assistance.


1.  Bend the drinking straw at the neck to create an “L” shape.  The short section of the drinking straw represents the pivot point – the point at which the center pivot is fixed to the earth.  It is equipped with a pipe which pushes water into the arm of the pivot.  The longer section of the drinking straw represents the arm of the pivot.


2.  Puncture four holes, evenly spaced, in a row along the top of the pivot arm.  Water delivered to the arm of the pivot will escape through these holes (which Frannie will refer to as nozzles) watering the ground below.


3.  Plug the hole at the longer section of the drinking straw with clay or a bead of glue.


4.  Bend the coffee stirrers (or twisty ties in this case) in half, and drape them over the center pivot arm.  These will be used to make the legs to support the arms of the center pivot.  Use a rubber band to affix the legs together and secure to the arm of the pivot.


5.  Glue your buttons (or construction paper) to the end of each pivot leg to represent wheels.


6.  Hold the pivot point stationary and observe how a center pivot works by moving in an arc pattern.  How does water enter the center pivot system?  Water is pumped into the pivot point from an underground aquifer (groundwater) or stream/pond (surface water).  This water is pushed down the length of the pivot arm and out of the nozzles.  The wheels keep the pivot moving to evenly disperse water over the crops.
 

7.  Insert the straw inside the aquarium tubing.  Because the diameters can vary from brand to brand, you may need to create a water-tight seal with clay or electrical tape.  Then fill the syringe with water and attach it to the other end of the aquarium tubing.


8.  Slowly press the plunger on the syringe and watch the flow of water into and out of the center pivot model.  Practice a few times!
 

9.  Once you have practiced irrigating, refill your syringe and irrigate in a 360 degree rotation.  Note your observations: How does the rate of speed at which the center pivot moves affect the pattern?  Does the force or amount of water pushed through the system affect the pattern?


For More Fun:


How do you think a center pivot could be more efficient at conserving water resources?  Consider evaporation and crop height!
One way farmers reduce the amount of water loss to evaporation is through the use of drop tubes.  Drop tubes are designed to distribute water closer to the roots, reducing the amount of irrigation water lost!  A drop tube is basically a rubber hose that transports water from the arm of the pivot and releases it directly on the crop, inches from the soil.

1.  Add drop tubes to your model by threading the needle with yarn.  Poke the needle all the way through the arm of the pivot (use the existing holes as guides).  Maintain a length of string hanging on the underside of the center pivot; this length should reach about ½” above the ground.  Knot each end to secure.
 

2.  Prime your model by refilling the syringe and slowly pushing water into the center pivot.  Once the yarn drop tubes become saturated, they will drip.
 

3.  Place a piece of dry felt/fabric/paper beneath your pivot.  Refill the syringe and make another 360 degree rotation.  Observe the pattern and volume of water used.  How does it compare to earlier results?

Want to see more Senior activities?  Click here.  Are you in Nebraska?  Check with your area's Juliette's Boutique!

Have you done a Senior activity and would like to share it?  Click here. 

Did you miss a post?


Wednesday, June 17, 2015

It's Water-Wise Wednesday with Frannie the Fish! {"Let's Keep It Clean" Program Series - Cadette}


Calling all Cadettes!


This week Frannie is going to share Cadette Resources and a fun activity.  Remember: complete two activities from the booklet to earn your Ask Me About Groundwater patch.  Get inspired and do more to earn your Let's Keep It Clean patch.

Cadettes will explore the connection between water and air, discovering what air is made of and creating a map of the layers of our atmosphere.  Scouts can also research air quality, learning how air can be polluted.  Next, girls can chart short- and long-term data to observe the difference between weather and climate.  To further their understanding of climate, girls can research climate change and see how their daily activities affect air quality by calculating their emissions.

Cadettes can then choose from a number of activities to do their part in helping the planet.  Learn about trees and their role in reducing air and water pollution, make environmentally-friendly cleaners, or learn how air pollution is connected to energy and water.

Leadership Opportunity:

For Cadettes that want to go above and beyond, visit a Brownie troop and teach them why it is important to take care of the environment by sharing Frannie the Fish's story, or create your own story to show how girls can prevent pollution.

This week Frannie is going to show you how to calculate your carbon emissions!


Instructions


1.  Click here to go to the Environmental Protection Agency's emission calculator.
2.  Ask your parent or guardian to help you fill out the required information for the calculator.


3.  At the bottom of each section, see recommendation for reducing your emissions.  Talk with your parent or guardian about these activities and encourage everyone in your house to follow them!


Want to see more Cadette activities?  Click here.  Are you in Nebraska?  Check with your area's Juliette's Boutique!


Have you done a Cadette activity and would like to share?  Click here.


Next week Frannie will be sharing resources for Senior Girl Scouts, including the booklet, patches, and a fun activity!

Wednesday, June 10, 2015

It's Water-Wise Wednesday with Frannie the Fish! {"Let's Keep It Clean" Program Series - Junior}


Frannie’s next stop on the “Let’s Keep It Clean” tour is the Junior level!


Complete two activities from the booklet to earn your Ask Me About Groundwater patch.  Get inspired and do more to earn your Let’s Keep It Clean patch.


The Junior activities focus on investigating the connection between water and energy.  When water flows or falls, energy is generated.  Energy created from water is called hydropower, this energy can be used to generate electricity – hydroelectric power.  This hydroelectric power may be what’s used to power your home!


Girl Scouts will learn that water is always on the move.  The activities for the Junior level feature an emphasis on the scientific method as well as utilizing mathematics to learn about water’s movement.  Through fun, outdoor activities girls can observe that it takes energy to transport water and that there are more and less efficient ways to move water.  Girls will also investigate how far the water travels from its source (an aquifer, river, or lake) to get to their home.  Additionally Girl Scouts can conduct their own research on water and energy’s connection.  Girl Scouts can find inspiration for earning their bronze award through fun and challenging conservation and education actions to reduce their water and energy use. 


Frannie is going to tell you how to have a bucket relay!  There are communities around the world that have to manually transport all the water they use from a single source (well, river, or a lake) to their home.  Collecting and transporting the water they need can be a fulltime job.  Each drop of water is valued and used wisely.


Supplies


  • 2 containers of the same size
  • 2 small plastic cups or ladles
  • 2 buckets
  • Water


Instructions


1.  Divide your troop into two teams.

2.  Line the two teams up, side by side, in single file lines, behind the empty container.  This is the start line.

3.  Set a bucket of water a set distance from the start line.  (Tip: change the distance depending on the age of your troop and the space available.)  Both buckets should be the same distance from the start line and contain the same amount of water.

4.  Give the first person in each line a small cup or ladle.

5.  On “go,” the first person from each team will run to the bucket of water, scoop up the water, and travel back to the start line.


6.  They will empty the water they retrieved into their team’s start line container and hand off the cup or ladle to the next girl in line.

7.  The teams rotate through until one team’s start line container overflows with water.


For more fun, you can add obstacles, have the girls walk backwards, only use one hand, or they could balance the cup of water on their head.


For a second activity:


 1.  Spread each team out in a straight line so there is approximately 2 feet between each team member.

2.  Give each girl an empty cup.

3.  On “go,” the team member by the full bucket will scoop a cup of water and pour it into the cup of the girl next to her.  The girls will continue this down the line and the last team member will pour the water into the empty bucket.


4.  The teams continue this until there is no water left at the beginning of the line.

5.  The team with the most water in their end bucket wins.

6.  Discuss which method was faster and which method was more efficient in moving water.  Was there a method that took more energy than the other?


Want to see more Junior activities? Click here!  Are you in Nebraska?  Check with your area's Juliette's Boutique.

Have you done a Junior "Let's Keep It Clean" activity and would like to share?


Next week Frannie will be sharing the Cadette booklet,

 patches, and a fun activity!

Wednesday, June 3, 2015

It's Water-Wise Wednesday with Frannie the Fish! {"Let's Keep It Clean" Program Series - Brownie}

This week in Frannie's exploration of The Groundwater Foundation's "Let's Keep It Clean" patch program is all about the Brownie level!


By completing two activities from the booklet you earn your Ask Me About Groundwater patch.  Get inspired and do more to earn your Let's Keep It Clean patch!

In the Brownie booklet, girls will learn what groundwater is and groundwater vocabulary through fun hands-on activities.  Girl Scouts will also learn how water gets into the ground by learning about the water cycle.  The girls will be introduced to Frannie through a fun, interactive story and also learn what can harm groundwater.  Finally the girls will learn how they can help keep groundwater clean and are encouraged to teach others about groundwater.

This week, Frannie is going to create a bangle that will help her learn and remember the water cycle!  For this activity, you will need:


Supplies

  • Pipe cleaner, string, twine, leather, etc.
  • 7/8" pony beads in eight different colors (each Girl Scout will need 2-3 beads of each color)
  • Water cycle illustration (there is one provided below)


Instructions

1.  Review the water cycle vocabulary.  Each word represents a different stage of the water cycle.  Check out Frannie's  water cycle post to get familiar with vocabulary terms.


2.  Assign each vocabulary word a different color bead.
3.  Pick a place in the water cycle to begin your journey.
4.  Twist a loop on one end of the pipe cleaner or tie a knot in the end of your string.


5.  Add a bead to your pipe cleaner and decide where to go next.  Use the water cycle illustration above to help you decide.  Remember if you start in a cloud you can't directly go to the lake, you must first become rain (or another form of precipitation, can you name one?)


6.  Each new place traveled will earn you a new bead.
7.  After you have completed the water cycle a few times, connect the ends of your pipe cleaner to create a bracelet to wear!


Frannie loves her bangle!  Now if someone asks her about it, she can share what she learned about the water cycle!


This is just one activity option in the Brownie booklet.  Order your booklets and patches here to find more options to do with your troop.  Are you in Nebraska?  Check with your area's Juliette's Boutique.

Have you done a Brownie activity and would like to share it?  Click here!


Stay tuned!  Next week Frannie will explore the Junior "Let's Keep It Clean" booklet and activity!