To earn the cool patches shown above, complete two activities from the booklet to earn your Ask Me About Groundwater patch. Get inspired and do more to earn your Let’s Keep It Clean patch.
Whether you are a meat-eater, vegetarian, or vegan, water is used to produce your food. The Senior “Let’s Keep It Clean” booklet explores water’s role in food production. Girls can investigate how much water is needed to grow crops or raise animals, find out what local water resources are used for agriculture, and learn how pumping groundwater for irrigation affects surface water. Scouts can also research different types of irrigation. Irrigation is adding more water to crop to supplement what’s provided by nature. Once Seniors understand the connection between water and growing our food, they can learn how to protect water. Girls can investigate local water quality by visiting a local water utility or by checking into a community’s annual water quality report. Another option is to learn about water conservation programs.
Frannie is going to make her own center pivot! Center pivots are one type of irrigation system - you may have seen one when you are taking a road trip. Center pivots have a series of sprinklers or drop hoses along a pipe that is supported by trusses and mounted on a series of towers. Each tower is on wheels and rotates, or pivots, around a center point, moving in a circle. Water is pumped through the center tower, also called the pivot point. Center pivots are generally nine feet tall but can be various heights depending on the crop being grown.
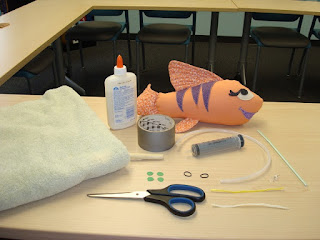
Supplies
- Bendable drinking straw
- Two coffee stirring straws (flexible) – in this case Frannie is using twisty ties
- Four buttons (1/2” to 1” diameter) – Frannie is using circles she cut out of construction paper
- Two small rubber bands
- Thumbtack
- Scissors
- Quick dry craft clue
- Modeling clay or plumber’s putty
- Aquarium airline tubing, 8” length
- Lure tip, or other needle-less oral syringe (obtain from a medical supply company, veterinarian, or pharmacy)
- ½ yard of felt, fabric, butcher paper, or craft paper
For More Fun:
- Yarn, 4 pieces cut to (roughly) 3” long
- Darning needle
Instructions
Refer to the illustration below for assembly assistance.1. Bend the drinking straw at the neck to create an “L” shape. The short section of the drinking straw represents the pivot point – the point at which the center pivot is fixed to the earth. It is equipped with a pipe which pushes water into the arm of the pivot. The longer section of the drinking straw represents the arm of the pivot.
2. Puncture four holes, evenly spaced, in a row along the top of the pivot arm. Water delivered to the arm of the pivot will escape through these holes (which Frannie will refer to as nozzles) watering the ground below.
3. Plug the hole at the longer section of the drinking straw with clay or a bead of glue.
4. Bend the coffee stirrers (or twisty ties in this case) in half, and drape them over the center pivot arm. These will be used to make the legs to support the arms of the center pivot. Use a rubber band to affix the legs together and secure to the arm of the pivot.
5. Glue your buttons (or construction paper) to the end of each pivot leg to represent wheels.
6. Hold the pivot point stationary and observe how a center pivot works by moving in an arc pattern. How does water enter the center pivot system? Water is pumped into the pivot point from an underground aquifer (groundwater) or stream/pond (surface water). This water is pushed down the length of the pivot arm and out of the nozzles. The wheels keep the pivot moving to evenly disperse water over the crops.
7. Insert the straw inside the aquarium tubing. Because the diameters can vary from brand to brand, you may need to create a water-tight seal with clay or electrical tape. Then fill the syringe with water and attach it to the other end of the aquarium tubing.
8. Slowly press the plunger on the syringe and watch the flow of water into and out of the center pivot model. Practice a few times!
9. Once you have practiced irrigating, refill your syringe and irrigate in a 360 degree rotation. Note your observations: How does the rate of speed at which the center pivot moves affect the pattern? Does the force or amount of water pushed through the system affect the pattern?
For More Fun:
How do you think a center pivot could be more efficient at conserving water resources? Consider evaporation and crop height!
One way farmers reduce the amount of water loss to evaporation is through the use of drop tubes. Drop tubes are designed to distribute water closer to the roots, reducing the amount of irrigation water lost! A drop tube is basically a rubber hose that transports water from the arm of the pivot and releases it directly on the crop, inches from the soil.
1. Add drop tubes to your model by threading the needle with yarn. Poke the needle all the way through the arm of the pivot (use the existing holes as guides). Maintain a length of string hanging on the underside of the center pivot; this length should reach about ½” above the ground. Knot each end to secure.
2. Prime your model by refilling the syringe and slowly pushing water into the center pivot. Once the yarn drop tubes become saturated, they will drip.
3. Place a piece of dry felt/fabric/paper beneath your pivot. Refill the syringe and make another 360 degree rotation. Observe the pattern and volume of water used. How does it compare to earlier results?
Want to see more Senior activities? Click here. Are you in Nebraska? Check with your area's Juliette's Boutique!


